
Software testing is a very important part of the SDLC (Software Development Life Cycle) as the testing team uses several types of testing to validate their application. It helps to ensure if the quality of software targeted is toward a specific end-user community or not. One of the testing that is used to complete the software development and ensure the quality of the software application is JUnit testing. JUnit is a tool for testing Java programs that makes writing tests that work well and reliably easy.
Although JUnit has several language supports, this tool was primarily developed for applications written in Java. It helps you to detect and fix various errors and bugs before making the software live for users. Early detection helps a lot in debugging time and the cost of fixing errors. To make the best out of your testing process, it is important to make your tests scalable and maintainable.
In this article, first you will see a brief introduction to JUnit and then you will see how you can create scalable and maintainable tests.
Introduction to JUnit testing
Junit is a very robust and powerful Java testing framework. It is widely used to create reliable, scalable, and efficient tests. JUnit works with many languages, but it really shines when it comes to testing Java apps and making it easy to create automatic tests. It provides the testing team with a suite of features that enhance your test writing experience and allow you to write scalable and maintainable tests.
Because of this, JUnit is seen as a system that can handle different types of tests, such as unit, functional, and integration tests. JUnit enables the testing and QA team to write the test easily and more readable. JUnit allows you to perform testing on the cloud. Due to several benefits, cloud premises are preferred. It makes your testing more scalable and reliable, along with enhancing the cost and time efficiency.
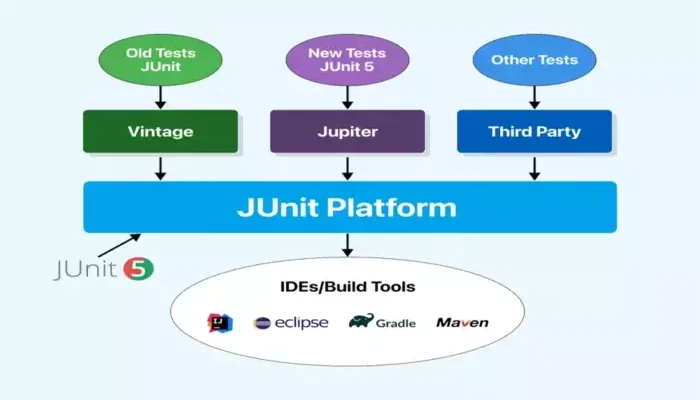
JUnit Working
Now, let us see how the JUnit works and enables you to perform software application testing. JUnit consists of several tests. Unit tests look at single pieces of code inside a class or method. Integration tests check how everything fits together, and system tests check the functionality of whole systems like web servers. If you have numerous tests, it is advised to run them simultaneously. If not run simultaneously, it will take a lot of time to execute the test. There are various features of JUnit testing that make it easy to create and run the tests. These are:
- Assertions: JUnit has many assertions which are used to verify the expected behaviour of the system. You can use the assertions in a set to check the results in an efficient way.
- Test Runner: This feature of JUnit testing is used to execute the tests and report the results. It is also a graphical test runner option that provides a graphical view of test results and allows you to make easy test analysis.
- Test Suits: It is considered a group of related tests, and you can run the group of tests together during JUnit testing.
- Reporting: After running the JUnit tests, it has the option to analyze the test results and extract useful information. It comes with a built-in reporter that writes out information about the tests that were run.
Advanced Techniques for Scalable and Maintainable Tests
Let us dive into the various advanced techniques that can be taken into account by the testing teams for scalable and maintainable tests.
Exceptional Handling in JUnit
Exceptional handling and timeout handling are two very important concerns that have been updated and enhanced in the JUnit 5. JUnit 5 fixes a big problem with how JUnit 4 handled exceptions and timeouts, giving writers more control over their tests and making them clearer. Specifically, in JUnit 5, the company introduced the assertThrows() method, which proved to be a very useful technique for making scalable and maintainable tests for JUnit testing. This method is used to locate the specific location in your code where the exception occurs. This method uses the lambda functions, which allows you to isolate the code part that is expected to throw the exception. For example, suppose you have a substantial test with an extensive setup; you can perform testing for a specific part of the code. Given below is an example that shows the assertThrows().
@Test
void shouldThrowException() {
// …
// Check to see if parser.parse() raises an IllegalArgumentException
assertThrows(IllegalArgumentException.class, () -> {
parser.parse();
});
}
Group Assertions for Comprehensive Testing
Group assertion is considered as a very advanced technique that helps you to test multiple properties of the software component in AEM (Adobe Experience Manager). This feature of JUNIT testing allows you to streamline the testing process by using multiple assertions in a single check. By doing this, the tester gets clear and concise information of any test failures. Let us have a look at the below example which shows how group assertions work.
@Test
void testNodeProperties() {
// Obtain the properties of the component
ValueMap valueMap = getValueMapOfResource();
// Group assertions for component properties
assertAll(“Component Properties Check”,
() -> assertEquals(“value1”, valueMap.get(“prop1”, “not_set”)),
() -> assertEquals(“value2”, valueMap.get(“prop2”, “not_set”)),
() -> assertEquals(“value3”, valueMap.get(“prop3”, “not_set”))
);
}
You can clearly see in the above example, the assertAll() method is used to combine multiple assertions in a single logic namely “Component Properties Check”. If any of the single assertions fail, the final output will fail. This method makes testing different component properties easier. It also makes sure that all of the settings are correct more quickly and easily, and it makes the test scalable and easy to manage.
Iterative Testing with @Repeated Test
While performing JUnit testing, there are some scenarios in which you need to perform individual testing of each of the child components from multiple components. In the past, writers might have used loops or tests that run over and over to make sure that each child component worked. However, with the introduction of JUnit 5, an efficient solution is to use the @RepeatedTest feature. Using this advanced feature of JUnit, the testing team can execute the same test multiple times, hence reducing the manual effort of test duplication again and again. You can perform efficient and scalable tests by annotating this test method, “@RepeatedTest” and you can get your work done.
Creating Parameterized Tests
Parameterized tests are defined as those tests that allow you to run the test with different inputs at different times. This advanced technique is useful for testing methods that take different inputs and produce different outputs. To use parameterized test annotation, you can use the “@ParameterizedTest” to create tests. Below is an example that shows how you can use the parameterized annotation in JUnit to create scalable and maintainable tests.
public class MyTest {
@ParameterizedTest
@ValueSource(ints = {1, 2, 3})
public void test(int number) {
(number > 0 && number < 4) assertTrue;
}
}
Lifecycle Callbacks and Test Execution Order
JUnit has added the latest feature, namely “Lifecycle Callback.” This JUnit feature allows the developers and testing team to perform various setup and teardown operations, that is, before and after the test method. This advanced method helps the team write more scalable and maintainable tests. Below is an example that illustrates how you can use @BeforeEach, @AfterEach, @BeforeAll, and @AfterAll.
import org.junit.jupiter.api.*;
public class MyTest {
@BeforeAll
public static void setup() {
System.out.println(“Before all tests”);
}
@BeforeEach
public void beforeEach() {
System.out.println(“Before each test”);
}
@Test
public void test1() {
System.out.println(“Test 1”);
}
@Test
public void test2() {
System.out.println(“Test 2”);
}
@AfterEach
public void afterEach() {
System.out.println(“After each test”);
}
@AfterAll
public static void teardown() {
System.out.println(“After all tests”);
}
}
In the above example, we have used the @BeforeAll and @AfterAll annotations to separate or teardown the operation into two portions that are before and after.
Improved test Display Names
This feature of JUnit testing helps the developers to improve the test readability and friendliness of test names by using the annotation “@DisplayName”. Using this feature, you can make your test code more readable and more easy to understand. For example, let us go through the below code to understand how this feature works.
@DisplayName(“Display name Class Level”)
@DisplayNameGeneration(ReplaceCamelCase.class)
class DisplayNameDemo {
@Test
void anotherTestCamelCase() {
// Test logic here
}
@DisplayName(“Test parameters with nice names”)
@ParameterizedTest(name = “Use the value {0} for test”)
@ValueSource(ints = { -1, -4 })
void isValidYear(int number) {
assertTrue(number < 0);
}
@Test
@DisplayName(“Test name with Spaces”)
void testNameCanContainSpaces() {
// Test logic here
}
}
This feature of JUnit is very helpful when you are performing testing in an Integrated Development Environment (IDE). It helps to display the code in an organized manner, and the code becomes easy to understand. Developers can access and use the testing process more easily and quickly when names are more descriptive. This leads to better writing and understanding of the tests. Thus, you can adopt this technique for JUnit testing to make your tests scalable and maintainable.
Dependency Injection with @ExtendWith
This is a very advanced feature that was added to JUnit 5. It helps the testing team to set a priority for the extension points over features. It enhances the features and functionalities available in your JUnit testing, offering a more versatile and extensible testing framework. In general words, extension points work as a gateway to additional functionalities in your JUnit testing process. In this extension, you also get ‘SlingContextExtension’ and ‘MockitoExtension,’ which enhances the capabilities for testing scenarios with the Apache Sling framework. Below is an example which shows how you can use the @ExtendWith feature:
@ExtendWith(SlingContextExtension.class)
@ExtendWith(MockitoExtension.class)
class MyJUnit5Test {
// Test methods go here
In the above example, the @ExtendWith annotation is used to incorporate multiple extensions into their test class. These extensions enhance various functionalities and enable a more organized and tailored testing environment. By leveraging the @ExtendWith feature, JUnit 5 enhances dependency injection capabilities, providing a flexible and extensible foundation for incorporating diverse testing functionalities into your test suite, and you can create scalable and maintainable tests.
LambdaTest provides robust support for JUnit testing, integrating seamlessly with the JUnit framework to facilitate automated browser testing across various browser environments. This compatibility allows developers to execute JUnit tests directly from their IDEs or continuous integration pipelines against a vast array of browser versions and operating systems hosted on LambdaTest’s cloud infrastructure.
Using Selenium with Java for automation testing helps identify compatibility issues by running tests in parallel, significantly reducing the time it takes to validate web applications across multiple browsers. The platform also provides features such as automated screenshots and video recording of test sessions, detailed logs, and a rich debugging toolset that enhances the efficiency of diagnosing issues.
Conclusion
If you are looking for a robust and powerful testing tool, you can go with JUnit testing. Junit is a very robust and powerful Java testing framework that is widely used to create reliable, scalable, and efficient tests. It is based on the Java programming language, but you can also perform testing for software applications developed in some other language. Creating a scalable and maintainable test is a very important part of the testing as it affects the application’s efficiency and productivity. To create a scalable and maintainable test, you can use several advanced methods and techniques such as group assertions, iterative testing with @Repeated test, etc.
Ampak Technology: The Future of Wireless Connectivity


Comments